|
|
|
|
|
Working with NidaplastThis is for information only. The product is no longer available in Australia.
1 -
CUTTING and MACHINING
NIDAPLAST Is a polypropylene honeycomb covered on both faces with a soft
polyester non-woven fabric. It is available in 2134 x1219 (4' x 7') ready
for direct use: lamination or gluing. The flexible and light sheets enable
an easy use in sandwich panels where most usual techniques of cutting,
laminating and gluing can be applied. Since it is a thermoplastic product,
other additional specific properties make its use even easier.
1.1 - CUTTING
NIDAPLAST is conventionally cut by usual means: saws, knives or a hot wire
OS it is thermoplastic.
1.2 - MACHINING
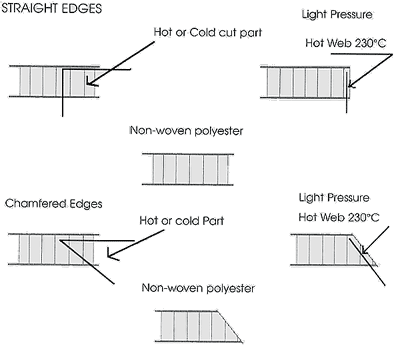
1) nidaplast polypropylene cells melt at 160°C (320.0"F) whereas the
non-woven polyester, which covers the facings, melts at 240°C (464°F).
Hence if nidaplast is heated at about 200°C (392°F), (it melts locally to
the shape required (hot stamping) without damaging the non-woven facing.
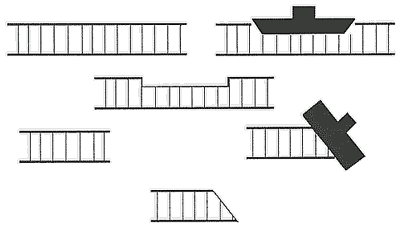
2) A second way is to cut the required shape and then to re-weld the nor
polyester. For example, the following edges can be achieved:
2.1 - COLD FORMING
The soft polyester non-woven scrim, which covers the large faces of
nidaplast makes it formable by:
- In the case of standard panels (3 psi to 12 psi) should be applied
during curing time of polyester or glue. This can be done on a mold with
vacuum or a matched die mold and a press.
- In the case of marine panels (scored 2" x 2" = 50mm x 50mm one side), a
simple mold is sufficient.
2.2 - HOT FORMING and PRE-FORMING
Again a thermoplastic product Is easily thermoformed:
In an oven, in 3d mold, at less than 100°C (212°F), nidaplast softens and
under a very light pressure it very easily takes the required shape.
nidaplast can also be hot preformed. Two possible processes:
- Preheating in an oven between 140°C (284°F) and 150°C (302°F), then
forming in a cold mold.
- Forming in a mold heated at 130°C (266°F) -140°C (284°F).
In both cases nidaplast will keep its shape at cold temperature.
In all cases, temperatures, pressures and timings should be setup
according to the shape of the par and to the thickness of nidaplast.
3.1 - LAMINATION
The non-woven polyester applied on nidaplast is an ideal surface for
direct lamination of thermo hardening resins of polyester type (or other).
However, considering their huge variety, resin formulations and lay up
techniques should be checked against their compatibility with nidaplast.
Most traditional techniques (hand lay up, spraying, vacuum, pressing, low
pressure injection), which are function of existing tooling and depend
upon the parts to be achieved, can be applied and need only slight
adjustments to nidaplast specificities.
Within the
NIDAPLAST range, nidaplast 8 is especially suitable for
lamination. Indeed. nidaplast has, as an under face of the non-woven
polyester, a plastic film which restricts resin passing trough into cells.
The operating principle of sandwich panels is to have a perfect adherence
between the core and the rigid skins. Therefore when working up a panel,
it is necessary to check:
-The good impregnation by resin to the core and skins.
- The good contact, e.g. through pressure, between the core and the skins.
Manufacturing process of a laminated sandwich panel with a nidaplast core:
a) Traditionally make the first skin of sandwich panel (gel coat on the
mold, then required layers of glass-resin).
b) Before the first skin has hardened, apply nidaplast, interposing an
extra ca 400-g/m.2 quantity of resin, either applied on the skin or on
nidaplast when hand lay up laminating.
If necessary, in the manufacturing process or in case of a thin laminate
and if a very high quality surface finishing is required, it is possible
to let the gel coat and one of several layers of glass-resin polymerize.
As soon as polymerization is over, a last of glass-resin is spread in
order to glue nidaplast as explained earlier. It is also possible to glue
with shrink less polyester glue.
c) On nidaplast, traditionally apply the required layers of glass-resin of
the second skin, providing for and extra ca 400-g/m2 (1 1/2 fl. oz./ft.2)
quantity of resin to impregnate nidaplast and to ensure gluing with the
laminate.
If necessary or if a gel coat finishing is planned on both faces of the
sandwich, either a mold and countermold are used, or the first layers of
the as explained before.
Pouring resin in heaps on nidaplast without spreading it immediately
should be avoided in order to prevent it from going through into the cells
by gravity.
As nidaplast is a heater insulator, using a resin with too much exothermic
should be avoided since it could damage the laminate or cause air bubbles.
A glass mat should be preferred to a fabric for direct contact with
nidaplast.
d) Once the part is achieve, it is advised to apply the most evenly
distributed pressure on the whole (vacuum, press, and weight...).
Hand lay up working is possible but a good nidaplast laminate bonding (on
the mould side) should be ensure by a former impregnation of nidaplast
then by a hand pressure on nidaplast when fitting it. It is the same on
lamination by simultaneous glass-resin spraying. Bonding of the other side
is easier to check, as it is visible: additionally it is naturally made on
the pressure unbubbling of the glass-resin layers.
e)Two methods may be used for bedding scored nidaplast Honeycomb. The
first method uses either Chopped Strand Mat (CSM) or chopped fiberglass
from a chopper gun and the second uses a core bonding putty or a sprayable compound.
• Assuming the gel coat, skin coat and any additional structural
laminates of the outer skin have polymerized and returned to ambient
temperature you may proceed to core bedding. To achieve a good chemical
bond this should be started as soon as this "green" cure stage is reached.
The fiberglass will have a "surface tack" indicating that it is still
chemically active and subsequent laminates will adhere well. Also, please
note that the scored core flexes freely in both axesso that it will
conform to the tool.
• To properly bed the core, there should be no projections from the
laminate surface that might create an air pocket underneath core. These
may be sanded or ground off and any dust, particles or loose fibers
removed.
• The surface should be wet out and a layer of 1.5 or 2oz CSM or the
equivalent in chopped strand from a chopper gun. This bedding layer should
be thoroughly saturated with catalyzed resin and rolled out to eliminate
air bubbles.
• The core may be bedded scored side up or down depending on whether
the mold is convex or concave. Just prior to bedding the core, a small
amount of resin should be sprayed or rolled onto the side of the core to
be bedded. This will prevent the scrim from potentially leaching resin
from the chopped fiberglass bedding layer.
• Press the lightly wetted core firmly into the chopped strand
layer. If the core does not stay fast to the contour, perhaps a few relief
cuts will have to be made along the scoring lines. When all the core is
observed to be firmly bedded, allow the bedding layer to polymerize
without disturbing until it has returned to ambient temperature before
proceeding to the next laminate. This is to prevent out-gassing or extreme
exotherm from creating bubbles or blisters in the subsequent laminates.
• The process for trowelable or sprayable core bonding is identical
with only the replacement of chopped strand fiberglass with a filled and
thixotroped resin to adhere the core. As with the chopped strand bedding,
a little extra resin must be applied to the bedding side of the core to
prevent the scrim from leaching resin from the compound and potentially
creating a resin starved interface. Instructions for use of Nida-Bond CBC
may be found in our website or in our catalog/handbook.
RTM
RTM techniques are possible with some products of the nidaplast range. It
depends on the technique used, injection pressure, temperature, and
fluidity; therefore it is preferable to consult us in order to decide
together upon a suitable product.
3.2 - GLUING
There again, non-woven polyester is used as a gluing surface to a lot of
rigid skins such as wood, melamine laminates, marble, fibrocement or
metal.
The glue to be used essentially depends upon the skin to be glued and on
the physical and the mechanical strains applied to the finished sandwich
panel. Numerous glues were already satisfactory tested on nidaplast:
polyurethane, epoxy, neoprene, vinyl, polyester, and ureaformaldehyde.
However, in all cases using a glue, tests should ensure compatibility of
the different materials and the mechanical properties of the sandwich
panel made. Polyurethane or epoxy bicomponent glues are the most often
used thanks to their good mechanical characteristics and their adherence
on most materials.
According to the manufacture's directions, evenly apply the required
quantity of glue on the rigid skin or on nidaplast or both at the same
time, if so required by the glue. For polyurethane glue the quantity
should be around 400 g/m2- (11/2 fl.oz/ft)
In the same way apply glue on the second skin or on the face of nidaplast.
On the panel made apply the pressure specified for the glue, minimum of
0,2 bar and maximum of 1 (15 psi 29 In Hg,) bar is enough with regard to
nidaplast. Let the glue set under the indicated conditions before handling
or applying efforts on the panel.
Characteristics of the sandwich panels are mainly due to the good
adherence between the core and the skins, therefore a special care should
be brought to gluing and the results obtained should be well checked.
Note: Cells may show through the glued skin if the latter is too thin or
not rigid enough. Print through is made worse by an excessive gluing
pressure and/or the glue shrinkage when drying.
3.3 - WORKING UP PREPREGS
The high melting temperature of polypropylene makes it possible to use
prepregs, which polymerize at temperatures up to 125°C (at 100°C [212°F]
nidaplast still resist to 1 daN/cm compression).
Position the prepreg on nidaplast, apply pressure at the required
temperature and let the whole polymerize. According to the temperature and
to the polymerization time, check that there is no risk of collapse of
nidaplast due to the flow. Under a press, a possible solution consists in
positioning shims very slightly less thick than nidaplast in order to
avoid this flow.
Unmolding should not be carried out too hot to avoid any risk of
distorting the panel or of de-laminating nidaplast.
4 - FINISHING of the
4.1.1 - LAMINATED PANELS
Several types of finishings are possible in case of laminated panels.
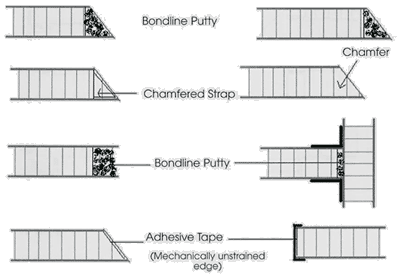
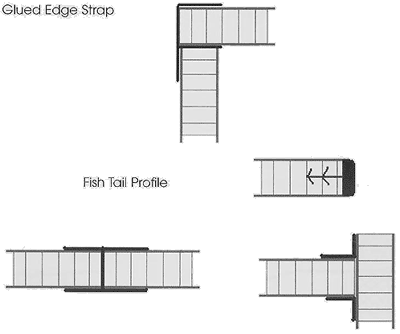
Molding of polyester skins makes if easier to work out edges as shown in
the following examples:
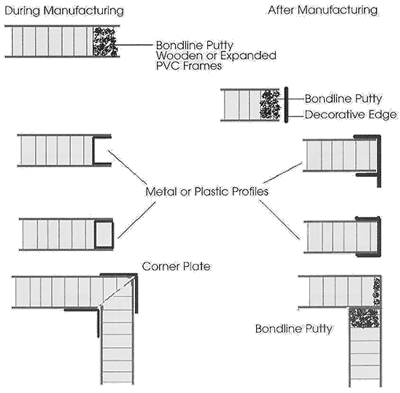
Most frequently, edge finishing is carried out through a frame or a
finishing profile. It's material will be chosen according to the
physico-chemical strains of manufacture and use. Wood is interesting by
it's very wide flexibility of use but it may require trimming and is
sensitive to moisture. Plastic or metal enable a direct finishing but need
a very exact size.
Setting the frames or profiles can be carried out, as shown by the
following examples, either before or after the panel is made:
4.1.3 - GLUED PANELS
Several types of finishings are possible according to the skins, the panel
use and the mechanical strains applied. Unstrained decorative edges can be merely glued an both rigid skins. In case of a metal sheet, a mere fold can hide the edge.
4.2 - LOCAL STRENGTHENING PARTS, FIXING INSERTS for ELEMENTS OR OBJECTS
Fixing elements on a sandwich panel may require local strengthening parts
or inserts.
Choosing the adequate solution essentially depends on the strains
transmitted by fixing to the skins or to the core.
Fixings can be tranversing or not.
4.2.1 - NON TRANVERSING FIXINGS
4.2.1.1 - LIGHT LOADS
Considering the good cohesion of nidaplast and the good adherence of skins
if they were bonded up properly, fastening can be carried out in a normal
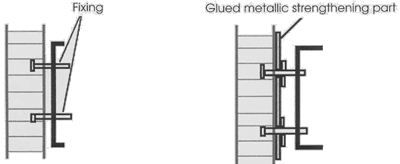
way: rivets, bolts and, self tapping screws, on only one skin (Fig. 1).
If the load makes it necessary or if the skin is insufficiently strong, a
glued metallic strengthening part can be added and will distribute the
stress (Fig. 2).
4.2.1.2 - HEAVY CONCENTRATED LOADS
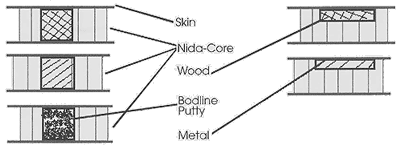
The most frequently used insert is wood, but metal or resin inserts are
also suitable.
The insert can occupy the full or only part of the thickness of the panel.
Considering the fixings to be made, inserts can be large or small:
a) Large inserts
b) Small inserts
4.2.2 - THROUGH FASTENINGS
Through fastening can be carried out:
4.3 - THERMOWELDED INSERTS
Because of its polypropylene composition, nidaplast can very easily
receive polypropylene inserts by friction welding.
The 15mm thick insert, whose diameter can vary according to the resistance
wished, is positioned or nidaplast at required spot.
Using to a rotating tool at 1500 revolutions a minute, a light pressure is
applied on the insert.
Rotation and pressure create the heating, which enables a perfect welding
between the insert and nidaplast.
The panel thus prepared can received the final skins. On the insert, solid
fixing is carried out with specially adapted screws.
Enquiries Please call Boatcraft Pacific 07 3806 1944 ( +617 3806 1944) for how to contact your nearest reseller. Copyright Boatcraft Pacific Pty. Ltd. | |||

